Friday, July 30, 2010

Farm Equipment Fridays: Raking hay

1 comment:
FEF badge thumbnail
After the hay has been tedded and dried, it needs to be raked into big piles. 
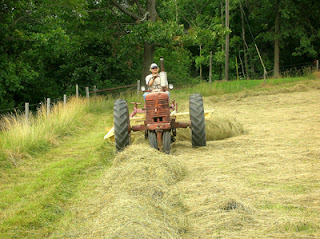
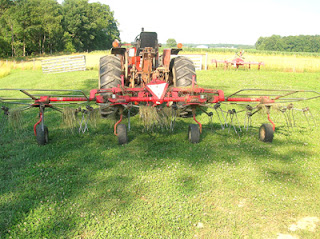
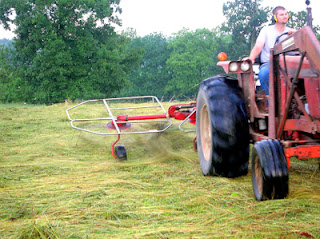
The rake does exactly what it sounds like it should do.  It gets pulled behind the tractor...
raking hayfield 1

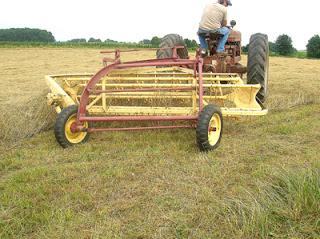
It has these tines that spin around and grab the hay...
raking hayfield 2

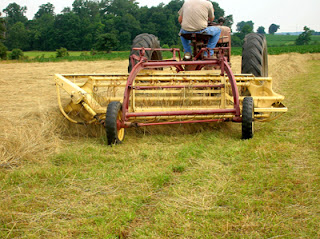
And the tines pull the hay into a pile just to the left of the tractor/rake combination.
hay rake 1

So after the rake passes by, there’s a long line of a pile of hay left behind.  This long pile is called a windrow.  Depending on the thickness of hay in the field, sometimes one windrow gets raked again with more flat hay to form an even bigger windrow.
hay rake 2

Once the windrow of hay is thick enough, another windrow is started.
raking hayfield 3

And on and on, around the field it goes.
raking hayfield 4


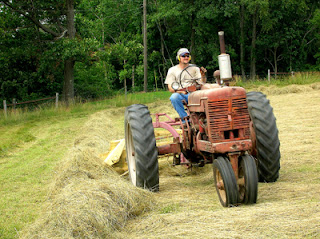
Here’s a close-up of the rake coming…
raking hayfield 5


Here it is!!
raking hayfield 6


And there it goes…
raking hayfield 7

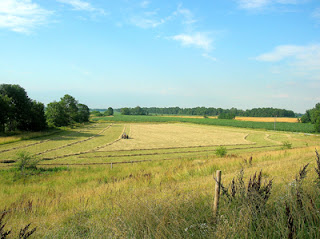
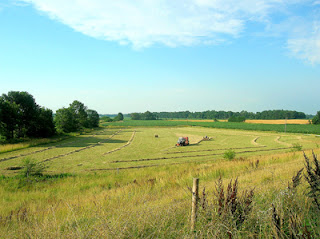
Here is our lower field, partly raked into windrows.  I think this looks pretty neat from the birds-eye view.
raked hayfield


I would have loved to give you a shot of the whole lower field raked and ready to bale.  But, before the raking was finished…
baling hay in a raked field


The baling had started!

More on the round baler next week…  That is by far the coolest part!


Step 1 - Mower/conditioner
Step 2 - Tedder
Step 3 - Rake
Step 4 - Baler
Step 5 - Bale Spear

Bull adventures update

No comments:

Thanks to everyone who sent their thoughts and prayers our friend’s way.

He is still in the hospital, but has been out of ICU.  He is flirting with all the nurses, so I guess he doesn’t feel that badly!

He’ll likely stay in the hospital over the weekend, and then will be home early next week.  The challenge will be making sure he rests, instead of trying to jump back into farming!

Tuesday, July 27, 2010

You don’t need to be a professional bull rider…

No comments:
Last week, one of my heros, The Pioneer Woman, posted about the Professional Bull Riding bull riders.  She talked about how dangerous this sport is, and how powerful the bulls are.

Well, you don’t need to be a professional bull rider to be hurt by a bull.

A close friend of ours was seriously injured by his own bull yesterday. 

This was a supposedly “tame” bull.  He had been shown in 4H as a calf, and was used to being around people and to being handled.  He was even halter broke (as halter broke as a bull can be). 

He was relatively easy to handle and be around when he was 500 pounds.

Now, this bull is full grown, and pushing 2000 pounds.  (That’s right, 2000 pounds.  That’s one ton.)  He’s a big bull.  And when he wants to do something, he does it.

Even though he is “tame,” that does not mean he is safe to be around. 

I am not clear on the details of what exactly happened yesterday, but our friend was out in the pasture with this bull.  The bull knocked him over, and proceeded to “play” with him.  In the process, our friend suffered a broken leg, some broken ribs, a lacerated liver, and possibly a punctured lung.  He is doing okay, but is in ICU for a few days.

Luckily, someone was there with him, and was able to help him get out of the pasture to safety before he was hurt any worse. 

No matter what someone tells you, never trust that a large animal like this is “tame.”  At the end of the day, 2000 pounds is 2000 pounds.

Friday, July 23, 2010

Farm Equipment Fridays: Tedding hay

2 comments:
FEF badge thumbnail

This is a hay tedder.
hay tedder

(When I first heard of this contraption, I thought Bob was as good of a generic name as Ted.  So I called this a Bobber.  Do not do this in front of any serious farmer.  You will get laughed out of town.)

The tedder’s job is to grab the hay with these spinny tines, flip it around, and let it fall back to the ground.
hay tedder tines

The long tines on this thing spin around, grab the hay off the ground, and throw it up in the air.

Here it comes…
tedding hayfield 1

Hi honey!
tedding hayfield 2


Here it is…
spinning tedder tines

And there it goes…
tedding hayfield 3

tedding hayfield 4


Although throwing hay sounds like fun, it also serves a couple of purposes. 

First, the tines damage the waxy outer surface of the hay more (the conditioner part of the mower/conditioner starts this process), which helps the hay dry. 

Second, the throwing action also does some flipping, so the parts of the hay that were underneath before the tedding are on top after the tedding.  This also helps dry the hay.

Making sure the hay is completely dry before the baling process is very important.  Once hay is baled, it can be stored for years (although it does lose some nutritional value after a while).  If hay is baled when it is wet, it can grow some pretty nasty mold that can cause diseases in the animals eating it, and in the people handling it.

A less obvious reason that hay needs to be dry is heat production.  Wherever the hay is stored, it is exposed to lots of heat – whether this is in a barn all summer long, or sitting out in the sun in a pasture somewhere.  If the hay is baled wet, the outer surface of the hay will dry out, no big deal.  The inner parts of the hay bale, on the other hand, are a different story.

Wet hay heats up.  Period.  As the hay is exposed to ambient heat, it gets even hotter.  Believe it or not, it can get hot enough to spontaneously combust, and can cause some pretty nasty fires.  (Ever been in a barn that’s full of hay and straw?  Yep, huge fire hazard.)

Right.  So dry your hay.  Please.

tedding hayfield 5

We tedded the morning after cutting, the following morning, and again that afternoon for a total of three teds before the hay was dry enough to bale.  The length of time it takes for the hay to dry depends on the weather (Rain while hay is down is a farmer’s worst nightmare.  Well, one of them anyway.), the thickness of the hay (how thick the grass is before it gets cut), and the type of hay.

We farm primarily grass hay, which dries relatively quickly.  There’s a few different types of hay – perhaps that will be another post of its own.

For us, we cut on a Tuesday, tedded on Wednesday morning, tedded again on Thursday morning and afternoon, and were able to rake and bale Thursday late afternoon.

Here’s our lower field, all tedded up.
tedded hayfield


Next week – raking!  (Way easier than the raking your leaves in the fall.)


Step 1 - Mower/conditioner
Step 2 - Tedder
Step 3 - Rake
Step 4 - Baler
Step 5 - Bale Spear

Thursday, July 22, 2010

Pedal Tractors

No comments:

It is fair time in this part of Indiana, and boy are we in it!  Our fair started on July 4th, and was hot, and wonderful.  The surrounding counties are also in full swing.

Around here, fairs mean 4H, food, and fun (more for some of us than others).  Hubby is on our county fair board, which means that he spends an extraordinary amount of time at the county fair (translation – more hours than it is open).  And we eat most (for him, all) of our meals at the fair during the week.

But there is a new addition to the Southwestern Indiana County Fairs this year – the Adult Pedal Tractor Pull!

Most likely you have seen (or at least heard of) tractor pulls.  It’s where a guy on a big loud tractor (or truck) is attached to a big sled that generates more and more friction with more distance traveled.  So the farther you go, the harder it is to pull.  And the guy who pulls the farthest, wins!

Our county fair has had a children’s pedal tractor pull for years.  There’s a mini pedal tractor (remember Big Wheels?  It’s that, but it’s a tractor) attached to a mini sled.  And the kid who pulls (pedals) the farthest wins. 

This year, the Southwestern Indiana Young Farmers Group managed to get their hands on an adult-sized pedal tractor with a sled.  (We’re borrowing it right now, but are hatching a plan to build our own.) 

The Gibson County and Posey County Fairs have both featured a new event – the Adult Pedal Tractor Pull!

John pulled in both the GC and the PC events.

John pedal 1John pedal 2He didn’t win, but he was a serious contender in the Gibson County event!

I did not pull in the Gibson County pull, but I sure did in the Posey County pull!

   Marybeth pedal 1 Marybeth pedal 2

Don’t make fun of the unflattering pictures – those things are heavy!

And, hey, I won my event!  We had a $2.00 charge to play; 50% payout to the winner, and the rest was donated to Farmers Feed Us.  All of 6 women competed, but $6 bought me dinner at the fair that night!

You can see pictures of the Gibson County Adult Pedal Pull (and so much more!) on Facebook – search for Gibson County Fair.

Monday, July 19, 2010

Miller Mondays: Nontraditional Work

No comments:
Miller Mondays badge

Welcome back to Miller Mondays!  In this, the last section of 48 Days to the Work You Love, Dan talks about going into “nontraditional work” – not being a “regular” employee, but rather finding something creative to do with your time and your life, while still making an income!!

Our take home points today are:

1.  There are mountains of choices in the work environment today.  Sometimes the best options are just a small shift from what you are already doing.

2.  Focus on results, not time – this will open up new opportunities!

3.  You don’t have to change who you are to start your own business.  Incorporate your skills and abilities, personality traits, and values, dreams and passions into your new creative endeavor!

There are some basic questions to ask yourself to see if you have “what it takes” to do something on your own.  Dan goes into more details on all these in the book, but here’s the quick-and-dirty questions.  The more questions you can answer “yes” to, the better suited you are to running your own enterprise. 
  1. Are you a self-starter?
  2. Do you get along with different kinds of people?
  3. Do you have a positive outlook?
  4. Are you able to make decisions?
  5. Are you able to accept responsibility?
  6. Do you enjoy competition?
  7. Do you have willpower and self-discipline?
  8. Do you plan ahead?
  9. Can you take advice from others?
  10. Are you adaptable to changing conditions?
  11. Can you stick with it?
  12. Do you have a high level of confidence and belief in what you are doing?
  13. Do you enjoy what you are going to do?
  14. Can you sell yourself and your ideas?
  15. Are you prepared to work long hours?
  16. Do you have the physical and emotional energy to run a business?
  17. Do you have the support of your family and/or spouse?
  18. Are you willing to risk your money in this venture?
Dan tells us that about 60% of American homes are operating a home-based business.  On average, in 2003, home-based businesses generated around $52,000 in income!

Do you have to be so creative that you develop the newer, bigger, better mouse trap?  Absolutely not!
The trick here is to find something you are passionate about, and start running with it.  You don’t have to be completely original – often all you need to do is be 10% better than everyone else who is already doing the same thing!

Take Domino’s pizza for example.  They didn’t come into the pizza market with a better tasting pizza, a better sauce, a cheaper pizza.  All they did was add delivery to an already popular food choice.  Ta da!  How successful have they been?

Do you have an idea for an improvement on an already popular product or service?  Do you have an idea you have been thinking about “maybe doing something with sometime in the future?”  Make your future now! 

Ready, set, go!

Having said that, Dan does recommend what he calls “soft transitions.”  Don’t quit your job today with the thought that tomorrow you will start a webpage and on Wednesday you will be replicating your previous income with your new venture.  Recognize that it may take some time to get the ball rolling here.  Work on your new business idea in your spare time, in the evenings, or on weekends, while still in your “regular” job. 

Set some goals for yourself, and project a timeline.  Set a deadline for yourself – for example, “When my home-based business is creating 50% of my regular income, I will quit my day job and focus full time on my home-based job.”  Then go for it!

Be creative, be insightful.  Good luck, and most importantly, enjoy yourself!

Friday, July 16, 2010

Farm Equipment Fridays: Cutting hay

2 comments:
Since meeting my husband, becoming more exposed to farm life, and finally moving to our small farm, I have realized that there is lots that I don’t know about farming and farm equipment.

Lots.

The animal stuff I’ve got a pretty good handle on.  I’d better, after all my Large Animal Veterinary education!  It’s the crops that are new to me.

Mostly to educate myself, but also to educate fellow bloggers, I am officially starting Farm Equipment Fridays!

FEF badge
Last month, we cut and baled hay on our farm.  This goes on over a couple of days, but always is an “emergency.”  Once the hay “is down” (has been cut), everything has to happen pretty quickly.  The hay needs a few days to dry before it can be baled (the amount of time really depends on the weather), and there is usually a whole lot of hope and prayer that the hay will have time to dry, but not get rained on. 

The first step in cutting and baling hay is, obviously, cutting it.  The machine used for this is called a mower/conditioner.  Not only does it mow the hay, but it conditions it as well.  (Pretty obvious, yes?)


mower-conditioner

The mower/conditioner is pulled by a tractor.

mowing hayfield 1


The tractor drives offset from the mower/conditioner.  The tractor is driving over hay that has already been cut, so it doesn’t flatten the hay as it drives through the field.  Flattened hay is harder to cut with the mower/conditioner.

This particular mower/conditioner is a disc mower.  It cuts with a bunch of round disc-shaped blades that spin, just like a giant lawnmower.  The blades are on the front of the mower/conditioner.

mower blades

The mower/conditioner cuts (mows) the hay, and then the hay is sort of thrown back into the conditioner.  The conditioner part is on the back of the mower/conditioner.  The tines in the conditioner crimp the outer waxy surface of the grass, which helps it to dry faster.

conditioner tines


The mower coming…

mowing hayfield 2


The conditioner leaving…
mowing hayfield 3


This is our lower field after it has all been mowed.  Pretty, yes?  (This is part of the view I get from my office all day long.)
mowed hayfield


Next week?  Tedding the hay.

Step 1 - Mower/conditioner
Step 2 - Tedder
Step 3 - Rake
Step 4 - Baler
Step 5 - Bale Spear

Thursday, July 15, 2010

Back on the wagon

No comments:
I have not been very good with my alarm clock war lately.  There’s been lots of snooze button-hitting.  Frankly, it’s been pretty ugly. 

I also have not been all that great getting up in the morning to fit my exercise in.  This has been an issue for me since the well went out.  Something about not having easy access to a shower at 7:00am that makes it less appealing to get up at 6:00am to exercise.

And, well (no pun intended), once I got out of that habit, it’s pretty hard to get back into it.

So I am making another go at it.

I have set some weight loss goals for myself.  I am going to be at my goal weight by the end of 2010.  I have some intermediate goals to hit, and some non-food awards planned out as I hit them.

In order to make these goals happen, I will be getting back on an exercise plan.  Starting Thursday morning - up and going!

Of course, if I keep eating like I ate on Wednesday, that won’t be so easy!  But!  Back on the wagon it is!  Back to Weight Watchers meetings, back to tracking, and back to paying attention.  And back to only one snooze button hit in the mornings.  Whee!

Wednesday, July 14, 2010

Under construction

No comments:
Today I am at another workshop in Indianapolis at the Indiana Soybean Alliance.  We are learning more about blogging and networking and getting our messages out.

I'll be doing some construction and maintenance on my blog today, so bear with me.  Check back later to see the updates!

Thursday, July 8, 2010

Substantial blog

1 comment:
Thanks goes out to Meggie at Hoosier Farm Babe Tells Tails.    Last week she awarded me the Blog with Substance award!


In five words, I would say that my blogging philosophy, motivation, and experience is...

"Tell it like it is."

If you've been following me, at all, you've seen all the drama that happens here on our little farm.  Everything from cars stuck in the mud, lawnmowers stuck in the ditch, a flooded basement, to no running water, you'll see it here!  No punches pulled.  (Whether my husband likes it or not!)

So some other bloggers I would give this award to are...
  1. Dani Do It
  2. Frugalista Farm Life
  3. Going Jane
  4. Gal in the Middle
  5. Life's a highway...  and mine's surrounded by corn!
  6. Matt Schenk-n-Family
  7. The AG Grant Guru (not quite the same type of blog, but substance-filled none the less!)
  8. The Misadventures of a Modern Day Farmer's Wife
  9. And, of course special shout-outs to Goodeness Gracious 
  10. and Beyer Beware - they have both helped me so much with the blogging experience, couldn't be here without you two!
So, now the rules:
  • Thank the blogger who awarded it to you.
  • Sum up your blogging philosophy, motivation, and experience using five words.
  • Pass it on to 10 other blogs which you feel have real substance.
Done, done, and done!  Happy blogging!

Wednesday, July 7, 2010

The prodigal coffee pot

No comments:
I've been a bit down and out lately.  Last week was a rough week for me - had some serious sinus stuff going on, and it was tough to breathe and do anything else at the same time.  Finally, I am back close to normal.  (Well, to what passes for normal for me, anyway.)

Something has helped significantly with my recovery.

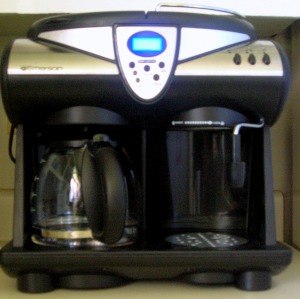
I got a new coffee maker again!

Way way back in the middle of May, the milk steamer part of my fancy coffee pot stopped steaming.  It made me sad.  I sent the coffee maker back to the company, and was told that I should have the replacement in approximately 3 weeks.

So I borrowed a coffee pot, and waited patiently.  Well, I waited, anyway.

I realized towards the end of June that it had been way longer than three weeks, and I still did not have a replacement coffee maker.  So I emailed the company on June 28.  I got a reply on June 29 that my replacement was expected to arrive on my doorstep that very day!

I was running errands, and when I got home at the end of the day on the 29th, my new coffee maker was waiting for me!

It has come home to me.

And it is pretty.


And it makes espresso.


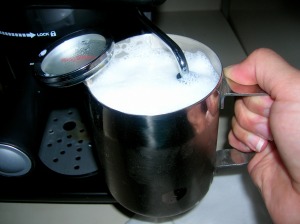
And it steams milk.


Does it ever steam milk.


Oh yeah, and it makes coffee too.

I am so very happy again.

Surely this will help to clear my sinuses right up!

Monday, July 5, 2010

Miller Mondays: Nuts and Bolts, part 2

No comments:
After my brief hiatus, I am back with Part 2 of "Nuts and Bolts" from Dan Miller's 48 Days to the Work You Love Career Kit.


We left off last time after discussing resume writing and developing a creative job search strategy.  This time, we'll talk about the interview and salary negotiating process.

The main points for this week are:

1.  The interview is a selling process.  You are in sales now - you are selling yourself!

2.  Interviewing means "to see about each other."  This is also a time for you to learn more about the company

3.  Most hiring decisions are made very early in the interview.  First impressions are essential!

4.  The first salary/benefit package offered is often open for negotiation.  By all means, negotiate!

First and foremost, it is important to understand that a person who does not interview well will not receive a job offer.  The interview is so essential - you must present yourself with confidence (but not too much).  You are there to tell the interviewer why you are the absolute best candidate for the job (without coming off as a snobby know-it-all).  It's hard to convince them that you are the best candidate when you are dressed in a t-shirt and jeans, or when most sentences start with "um, well..."

First impressions are so important.  Watch your clothing choices, hygiene, breath, you name it.  Watch your etiquette and (obviously) your language.  Watch your body language.  No slouching in your chair, no crossing your arms across your chest, things like this that may make you appear to be disinterested or closed off.  It's the little things that say the most.

Make sure you are prepared for the interview.  It is important to know yourself well.  The early parts of this process were focused on introspection - identifying the skills and abilities that you have that make you an attractive candidate for any job that you want.  Use this information now!  What can you do well, better than anyone else?  What are your values, and how are they reflected in your activities, both inside and outside your work life?  What are your dreams and passions?  Can you communicate these well to a potential employer?

There are a few common interview questions, and you should have answers prepared for them.  When you are asked to "Tell me a little about yourself," the interviewer does not want to hear, "What do you want to know?" in response.  You should have an answer ready that includes a brief personal background, education/work history, career highlights and professional achievements, and why you are looking for new opportunities.

When you are asked to talk about your weaknesses, please don't say that you don't have any.  We all do.  My biggest weakness is patience.  I have had a chance to work on that during my residency training, but it is still a problem for me.  (Something about the slower Midwest pace of life compared to the go-go-go pace I was used to in New England.)  Recognize that you have weaknesses, and tell them what you have done/are doing to improve here.

What are your strengths?  You should be as familiar, if not more, with your strengths as you are with your weaknesses.  If you can't communicate your strengths to a potential employer, how are they supposed to see what your strengths are?

You should also know the basic information about the company you are interviewing with.  Review the company's website at a bare minimum to familiarize yourself with the basics.  The more information you have, the more questions you can ask.  Asking questions (at the appropriate time in the interview), and the questions you ask, often can create a stronger impression than how you answer questions earlier in the interview.

Make sure you know where you are going, and who you are meeting.  Show up a few minutes early, but not too early (5-15 minutes is sufficient).  Do not be late.  If you have the option, schedule your interview for Tuesday-Thursday mornings.  Surveys have shown that most hiring decisions are made before 11:00 am.

Basic rules to remember?  Smile.  Be pleasant and outgoing.  Be self-confident.  Do not speak poorly of previous employers or coworkers.  Show interest in the company and the interviewer.  Know your resume thoroughly and be prepared to elaborate.  This all sounds basic, but as I said earlier, it's the little things that count!

After the interview, send a thank-you note the next day.  This creates another contact point, and helps with top-of-mind positioning.  In the note, say that you will follow up by phone on a specific date and time.  Do follow up when you say you will.  Continue to make follow up phone calls once a week or so until a decision has been made.  Don't pester, but be persistent.

Okay, now you've had the interview and been offered the job.  What's next?  Negotiate!

Most companies will offer a salary/benefit package that is less than what they have budgeted for the position.  Keep in mind that the salary is determined by the job responsibilities, not by your education, experience, or your previous salary.  The salary package should not come up in the interview process until the company has decided that it wants to hire you, and you have decided that you want the job.  If the interviewer brings this up too soon, simply say something like, "Let's talk about the position a little more to see if there is a match."  Once you have decided that you do want this job, you can bring it up again.

Dan has a long list of things that can fall under "compensation," including a company car, country club membership, life insurance, medical/dental/vision insurance, profit sharing, etc etc etc, all the way to a free parking spot and unlimited M&Ms.  (I'm a fan of the M&M compensation.)  What is reasonable for benefits depends on the company you will be working for, and on your needs/wants.

When you enter into negotiations, it is important to know what comparable salaries are for this type of position.  Use this as your bargaining position, not the salary you made at your previous job.  While you should have some fun with this process, there are a few important things to keep in mind.  First, you must make the company money.  If your salary request is more than they can expect to make from your work, they will not hire you.  Second, your compensation package relates directly to your level of responsibility within the company.  Third, the company is trying to negotiate, too.  Their first offer is typically not their final.  Fourth, get your package agreement in writing, with all the details.

Great!  Got the job?  Got the compensation package?  Now get to it!

But, wait...  What if I don't want a "traditional" job?

Come back next week for the section I have been looking forward to "Maybe I don't want a traditional job!"
Real Time Web Analytics