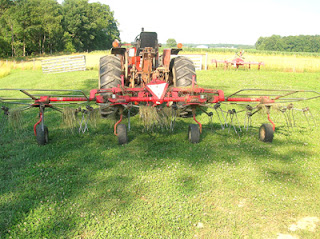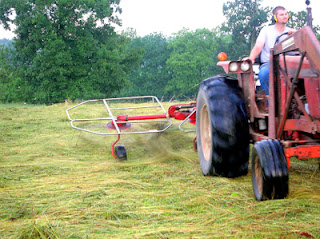
This is a hay tedder.
(When I first heard of this contraption, I thought Bob was as good of a generic name as Ted. So I called this a Bobber. Do not do this in front of any serious farmer. You will get laughed out of town.)
The tedder’s job is to grab the hay with these spinny tines, flip it around, and let it fall back to the ground.
The long tines on this thing spin around, grab the hay off the ground, and throw it up in the air.
Here it comes…
Hi honey!
Here it is…
Although throwing hay sounds like fun, it also serves a couple of purposes.
First, the tines damage the waxy outer surface of the hay more (the conditioner part of the mower/conditioner starts this process), which helps the hay dry.
Second, the throwing action also does some flipping, so the parts of the hay that were underneath before the tedding are on top after the tedding. This also helps dry the hay.
Making sure the hay is completely dry before the baling process is very important. Once hay is baled, it can be stored for years (although it does lose some nutritional value after a while). If hay is baled when it is wet, it can grow some pretty nasty mold that can cause diseases in the animals eating it, and in the people handling it.
A less obvious reason that hay needs to be dry is heat production. Wherever the hay is stored, it is exposed to lots of heat – whether this is in a barn all summer long, or sitting out in the sun in a pasture somewhere. If the hay is baled wet, the outer surface of the hay will dry out, no big deal. The inner parts of the hay bale, on the other hand, are a different story.
Wet hay heats up. Period. As the hay is exposed to ambient heat, it gets even hotter. Believe it or not, it can get hot enough to spontaneously combust, and can cause some pretty nasty fires. (Ever been in a barn that’s full of hay and straw? Yep, huge fire hazard.)
Right. So dry your hay. Please.
We tedded the morning after cutting, the following morning, and again that afternoon for a total of three teds before the hay was dry enough to bale. The length of time it takes for the hay to dry depends on the weather (Rain while hay is down is a farmer’s worst nightmare. Well, one of them anyway.), the thickness of the hay (how thick the grass is before it gets cut), and the type of hay.
We farm primarily grass hay, which dries relatively quickly. There’s a few different types of hay – perhaps that will be another post of its own.
For us, we cut on a Tuesday, tedded on Wednesday morning, tedded again on Thursday morning and afternoon, and were able to rake and bale Thursday late afternoon.
Here’s our lower field, all tedded up.
Next week – raking! (Way easier than the raking your leaves in the fall.)
Step 1 - Mower/conditioner
Step 2 - Tedder
Step 3 - Rake
Step 4 - Baler
Step 5 - Bale Spear


Cool post!! We usually run the rake through once with no tedding...but then we're kind of lazy over here, too! lol! :)
ReplyDeleteI can't wait to ask the Master of the Realm if he has bobbed the hay yet. lol.
ReplyDeleteWe had some nice 2nd cutting alfalfa get rained on last night. Sigh! First rained on hay of the year. Very nice description of a hay tedder. Sad to read about the bull episode. We have neighbors who were injured by a big "pet" bull. Always good to be wary around them.