Showing posts with label kitchen. Show all posts

Thursday, February 20, 2014

Organized Pantry

2 comments:
Not too long ago, we had a mouse in our pantry. I needed an excuse to clean out and reorganize the pantry anyway. So I jumped on this project one night after Baby Doc went to bed.

During our home remodel, we put in a very large pantry. It’s huge. And awesome. And easy to get filled up with stuff that (1) has been around so long we won’t eat it anymore and (2) doesn’t belong in the pantry. I’m really liking the way it is set up now, so I’m hoping that will be incentive enough to keep it looking (close to) this way!

Right on the back wall is the cereal section. I’m a big breakfast eater, so it’s important to me that the breakfast stuff is front-and-center, so to speak. On the next shelf is a collection of things like soup, tuna fish, and peanut butter. They… sort of… go together… but it seemed to make sense to me when I set it up.


organized pantry cereal and soup

Monday, August 6, 2012

5 kitchen gadgets I can’t live without

3 comments:
We’re finally settled into our new house. And I’m pretty well settled in the kitchen. I’m still moving things around now and then as I try to figure out the best places. It’s a work in progress.

The point is, after all the moving, building, and traveling we’ve been doing lately, I’m finally getting back into the swing of cooking. Most nights. And I’m rediscovering some of my absolute favorite kitchen gadgets.

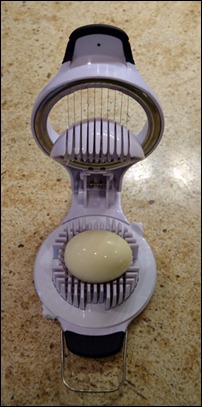
1. You’ve met this guy before. He’s an OXO egg slicer and chopper. First, he gently cradles the egg.

oxo egg slicer

Monday, June 4, 2012

Remodel Mondays – Settling into the kitchen

No comments:
We’ve been living in our new house for over a month already! It still doesn’t quite seem “normal” – it’s so different from the old house, I sometimes can barely believe that it is ours! (Well, ours and the bank’s…)

remodelmonbadge

After almost six weeks, I am finally feeling like we are pretty well settled in. If nothing else, the house looks “lived in” now…

We set up our fish tank set in the hallway next to the kitchen. This is also where three of the four cats get fed. We only have one fish in that tank right now… he is the lonely trooper who survived the move to the apartment and back. We need to get him some new friends now that the tank is in it’s final place.

kitchen during 01

Monday, April 16, 2012

Remodel Mondays – Finishing Touches

4 comments:
We are getting so close… Most of the major work is done and we are working on the finishing touches for our new house now!

remodelmonbadge

The kitchen is pretty well put together. The (giant) refrigerator is in place and hooked up. I love getting ice water right out of the door! They still need to finish installing the gas stove, but everything else is ready to go!

new kitchen 94

Tuesday, April 3, 2012

Remodel Monday – Kitchen cabinets

9 comments:
Okay, this is actually Remodel Tuesday. But yesterday I posted with some of my other Real Farmwives about some great Carhartt gear for the guys. (Did I mention that there is a Carhartt giveaway going on right now?)
remodelmonbadge

The cabinets are here, the cabinets are here! I’m so excited… I’ve been waiting for this part for so long!
I was really nervous when there were two boxes that wouldn’t even fit in the door…
new kitchen 38

Thursday, March 1, 2012

EuroScrubby

4 comments:
I have found the next best thing since sliced bread. Seriously. My new favorite thing in all the world. The EuroScrubby rocks!

Okay, maybe I’m a little over the top. But you have to see this to believe it!

Not too long ago, I made a batch of The Pioneer Woman’s comfort food meatballs. (Coincidentally, these were just featured on her Food Network show last weekend!)

I was left with a Pampered Chef Stoneware Rectangular Baker to clean out. And, I am not ashamed to admit, I did not clean it that night. I left it out. And the sauce dried to a hard sticky mess. Ick. So I soaked it for a few hours, and was left with this:

dirty stoneware
Pretty seriously gross.

Sunday, January 29, 2012

Remodel Mondays - Interior framing

3 comments:
Things keep moving right along, and we have been really happy with the progress on our new house!

remodelmonbadge
All the interior framing is done, so it’s easier for us to visualize the new floor plan, rather than just looking at the drawing.

The floor from the sunken office was raised, and the new window on the front of the house was framed out (covered in plywood towards the right of the photo). The old door was closed, and the new door was opened (and you can see outside now).

new kitchen 2

Sunday, December 25, 2011

Remodel Mondays – I always hated this kitchen

2 comments:
remodelmonbadge
This is the part I have been looking forward to the most. To be honest, this whole project started as a kitchen remodel, and exploded from there.

This was our kitchen to start with. A true galley kitchen. The dishwasher is the black appliance in the front of the picture, stove next to that, tiny counter space before the sink under the window, a little more counter space around the corner, and refrigerator wedged between the cabinets and the wall. We had so little counter and cabinet space that we added a free standing cabinet and microwave cart on the wall opposite the sink.
full 3 kitchen

Wednesday, October 12, 2011

Pampered Chef is coming! Pampered Chef is coming!

6 comments:
I am having a Pampered Chef party this week! I am so excited!

I am a Pampered Chef junkie.

Seriously. We registered with them for our wedding two years ago, and I haven't bought any Pampered Chef anything since then. I'm ready for my fix!

Here are a few of the things we love and use all the time around the house...

These bamboo spoons are a must-have. I use the flat one in the middle for browning ground beef all the time. Although, I do have my eye on the Mix N'Chop. I hear it is phenomenal for ground beef!


Thursday, June 30, 2011

Perfect Cheesy Pasta Bake, recipe #2

4 comments:

Welcome back for recipe #2 from In the Kitchen with the Real Farmwives of America & Friends and Gooseberry Patch!autumnfamilyfriendsThis is the first time I have cooked with chicken in a long time… We have freezer beef and freezer pork, so I don’t buy (or cook) much chicken. This time, I did! (And it was kind of a nice change.)ingredientsFirst, measure out 4 cups of uncooked pasta, and cook according to package directions. I used whole grain pasta, but no one says you have to. (The 13.5 ounce package I bought was the perfect 4 cup measurement.) Boil the pasta, drain, and put into a large bowl.cooked pasta
I had planned to use pasta sauce that we had canned last summer, but I only had pint jars left. This recipe calls for 3-1/2 cups, and a pint is only two cups, so I pulled this pinch-hitter out of my pantry at the last minute. Again, I just used the whole container. It was pretty close to 3-1/2 cups.pinch hitter
Then, grate up 1/2 cup of parmesan cheese. The pre-grated stuff is fine, too. I like to use any excuse to get out my fancy cheese grater!parmesan
Add the sauce (canned, jarred, or otherwise) and the parmesan to the cooked pasta.sauce and cheese
Mix it all up…mix it up
And put half the pasta in an 8x8 baking pan. Then put 1 cup of cooked, diced chicken on top of the pasta layer. (This is one chicken breast, boiled, and diced. It’s kind of a boring way to cook chicken, but the chicken is not the star in this dish – this is all about the pasta and the cheese!)layers
Layer the rest of the pasta on top of the chicken.

Grate up 1/2 cup Velveeta cheese (I prefer the 2% milk variety)…velveeta
And get yourself 1/2 cup shredded mozzarella (this was pre-shredded).mozzarella
Spread the cheeses over the top of the pasta dish.cheese
I didn’t think that looked like quite enough cheese. So I added extra mozzarella. Hubby Doc thinks I should have added even more.more cheese
Bake at 350 degrees for 30-35 minutes, until hot and bubbly. (In my stoneware, it took 35 minutes. Another 5 and the cheese should have gotten that pretty brown color.)melty goodness
I served this to my girlfriends with Garlic Bubble Bread (recipe coming this weekend!) for our girls’ night in. The girls loved it. (Although the bread took center stage!)plus breadDon’t worry, we ate our vegetables too. We had a veggie platter to pick from all night long. Just none of them made it on the plate… Whoops.

While we did enjoy the pasta, I would recommend a few slight changes. We all thought there could have been a little more sauce – maybe a can of diced tomatoes for a bit more texture? And you can never go wrong with more cheese… I will definitely make this again, but I might tweak it, just a little…

Special thanks to Gooseberry Patch for providing me with this great cookbook to try and to share with you. If you would like to see other great recipes, check out www.realfarmwivesofamerica.com.

Update:  Here's the printable recipe card!

{Affiliate links were used in this post.}

Tuesday, May 10, 2011

Comfort food

3 comments:

One of my favorite comfort foods is homemade macaroni and cheese. Preferably with a giant side of crusty garlic bread. (Can you say carbs?)

This is the homemade macaroni and cheese I grew up with…

First, gather your ingredients, including some minced onion.

(Look closely, do you see what I did? Oops.)ingredientsAdd a healthy dollop of minced onion to 1 cup of milk, and warm in the microwave. (This is a micro-intensive recipe. That might be why it’s one of my favorites.)onion and milkAs the milk/onion was heating, I thought to myself, “Self, that onion sure does smell strong tonight. I must have used more than I thought!”

Cube up 8 ounces of Velveeta cheese.cheeseAlso in the microwave, melt 2 tablespoons of butter. Mix in 2 tablespoons of AP flour, add a good amount of seasoned salt…seasoned salt…and a dose of paprika. (That Hungarian in me just loves some paprika!)paprikaIt was right about here that I noticed that I did not use onion to start this whole project, I used garlic. No, Chronic Sinus Congestion, you were not smelling strong onion. You were smelling lots of garlic.garlic oopsNo matter. Garlic goes great with pasta. I added some onion, too.

Back to the recipe!! Add the flour/butter/spices mixture to the milk/garlic/onion mixture. Stir well, and heat in the microwave for 30-second intervals, stirring between. When the sauce is nice and thick, add the cubed Velveeta, a little at a time, and continue the 30 second microwave intervals.add cheeseCook one pound of pasta (I usually use elbows, but all I had in the pantry this time was penne), drain, and put it in a casserole dish.

When the sauce is cheesy and melty, pour over the pasta, and stir to coat all the nooks and crannies. (Does penne have crannies?)cheesy goodnessMy favorite part (although this is totally optional), is the crumby topping. I take whatever boring cereal we have in the pantry, and crush a bunch with my big rolling pin.

This is one of the only times this rolling pin comes out. Except when I’m chasing Farmer Doc around with it. (Thanks, Laurinda!)make crumbsMix the crumbs with more melted butter, and please use a bigger bowl than I did.crumby messSpread the buttery crumbs over the top of the cheesy pasta.oven readyAnd bake in a 350 degree oven for 10-30 minutes.

This is when Farmer Doc walked in and said, “Something smells really garlicky!” Oh, sure, he has clear sinuses. So I chased him around with the rolling pin.

This baked for about 20 minutes. The dish was a little shallow, and I wish I had pulled it out of the oven after only 15. But I was distracted by the chase with the rolling pin. Oh well. It was still yummy.hot and bubblyPrintable recipe card:mac_and_cheese_recipeEnjoy!!

Friday, April 22, 2011

Easter lamb cake

10 comments:
The Easter lamb cake was a tradition in my house growing up. My mom used to make it with a pound cake mix. Because I wanted to play in this month’s Iron Chef Challenge hosted by A Latte with Ott, A, I made a cake from scratch!IronChef ClabberGirl

Having never made a pound cake (or any other cake, for that matter) from scratch, I searched for a recipe. My favorite, Alton Brown, had what looked like a yummy pound cake recipe, but it didn’t use baking powder. I did manage to find a cake recipe on Allrecipes.com that was supposed to be used with this lamb cake mold! Cool! (And thanks!)

Easter lamb cake

First, I assembled the ingredients, including a brand-new container of Clabber Girl baking powder.ingredients

Don’t forget your lamb cake mold! You do have one of these, don’t you?

lamb mold

Cream together 1 cup of butter and 2 cups of sugar (I used Splenda instead of sugar).

cream butter

Mix together 3-1/2 cups all-purpose flour, 2-1/2 teaspoons baking powder, and 1/2 teaspoon salt.

This recipe says to add 1 cup of water to the butter/sugar mixture and mix that well, then to add in the flour mixture. I tried just adding the water, and it made a mess. Really. The water didn’t combine with the butter/Splenda, and it splashed all over my counter. (Because the butter was too cold? Because it was Splenda instead of sugar? Any ideas?)

So I just added the flour mixture, and a little more water to compensate for the water that was on my counter. Then mix in 1 teaspoon vanilla.

add flour

Then, beat 4 egg whites until stiff. I had never done this before, and it was much easier than I thought it would be. Hooray for hand mixers!

beat egg whites

Peaks! Neat!

egg white peaks

Fold the egg whites into the batter.

fold in

Grease both halves of the lamb mold within an inch of your life.

ungreased mold

Really. Just when you think it’s greased enough, grease it some more. I usually use butter for greasing pans, sometimes the spray stuff. For this project, I busted out the Crisco. I wanted some serious grease!

greased mold

Fill your mold, but pay attention to the type of mold you have. This mold is meant to be filled on the “front” half of the lamb, and baked as a single piece. Some are meant to be baked as two halves and put together at the end.

full mold

This mold has a small vent hole in the back of the lamb’s head. (That helps me to remember which side goes up – the hole goes up so the poor lamb’s brains don’t leak out in the oven!)

I put the mold, face down, on a cookie sheet and into a 350 oF preheated oven. Bake for 45-50 minutes.

bake cake

Then I did a little dance because all the dishes I used to make the cake went into the new dishwasher! After I started it, I thought to double-check that my stainless steel mixing bowls are dishwasher safe. (Phew! They are!)

full dishwasher

After 45 minutes in the oven, I used a toothpick through the vent hole to see if the cake was done. The toothpick came out clean, so I pulled the cake. I let it cool for a few minutes before I carefully took off the back of the mold. (I had a little accident with part of the cake. Remember what I said about grease?) I didn’t think he looked quite done enough, so I gently put the mold back on, and stuck him back in the oven for another five minutes.

almost done

Five minutes later, done lamb cake! I had to use a knife to loosen the cake from the edges of the front part of the mold. I didn’t grease that part too well, I guess. Once the edges were loosened, he came right out!

done

Cool completely, and then start the icing!

First, put a layer of icing on your cake base so the lamb has some help standing up. (This cake should stand on its own, but this will give a bit more stability.)

base

I used icing from a can. I thought about making my own, but decided making the cake from scratch was enough to handle this time around.

Then I had to do a little surgery to put the lamb back together again.

surgery 1

Good thing I am a large animal veterinarian!

surgery 2

Stand the little guy up, and go to town with the icing!

standing

I started with the back to get my technique down. I didn’t want a really “smooth” look, so it sort of looked like wool.

iced back

My mom used to dust the cake with coconut to give it some texture. We’re not big coconut eaters here, so I skipped that step.

iced front

I did dust him with sugar (the real stuff!) for some dimension, and gave him jelly bean eyes and a nose.

features

Add some grass for him to sit on, and some friends for him to hang out with.

Easter lamb cake

Since my cats like to eat things they are not supposed to, I made sure to use the paper Easter grass, instead of the plastic stuff. Plastic stringy things are bad news for kitties. Always.

Now, if only my cake dome would fit without squishing the poor lamb’s head! Drat!

dome

Happy Easter!

easter_lamb_cake

Also linked to Sweets for a Saturday at Sweet as Sugar Cookies.
 and Seaside Simplicity's Easter Party.

{Affiliate links were used in this post.}
Real Time Web Analytics